Getting a proper bike fit is the single most important step you can take when purchasing a new bike or pulling an old bike down from the rafters to begin riding again. A properly adjusted saddle, handlebars and brakes make a world of difference in comfort and performance. You will enjoy your ride more, minimize any chance of muscle strain or injury, and be more excited for the next ride when you take a little time to make the necessary adjustments.
Let's start with saddle adjustment. Brakes and handlebars can be tricky. If you're a novice you may want to visit your local bike shop for these adjustments. Saddle adjustment, on the other hand, is pretty straight-forward and can be done at home with minimal tools. Start out with a level surface next to a wall or garage door.
More: The Truth About Your Bike Saddle
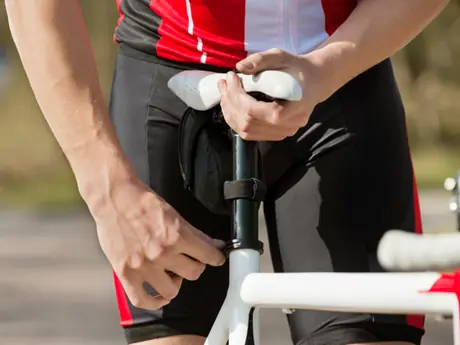
All you'll need is an Allen wrench (preferably a torque wrench) and a plumb bob. It's best if you have someone who can help you when making these adjustments, as you'll need to be seated on the bike and have another set of eyes to check your position. If you don't have a plumb bob you can make one by tying a pencil to the bottom of a piece of string about 30 inches long.
Start out with a level surface next to a wall or garage door. There are three basic aspects to saddle adjustment:
- Saddle height
- Saddle position fore and aft
- Tilt or angle of the saddle
More: Home Remedies for Saddle Sores and Chamois Rash
Saddle Height
To determine correct saddle height you can sit on the bike while leaning against a wall or garage door with your outside pedal all of the way down at the bottom of the pedal stroke, perpendicular to the ground. Be sure that you are sitting evenly on the saddle and not leaning to one side or the other.
When your saddle is at the proper height you should have 27 to 37 degrees of flexion in your knee with the pedal all of the way down at the bottom of the pedal stroke. Raise or lower your seat by loosening the seat post clamp and moving the seat post up or down as needed.
- 1
- of
- 2
About the Author


Discuss This Article