No matter if you're new to cycling and are trying clipless pedals for the first time, or if you've ridden hundreds of miles and have finally worn them out, cycling cleats are one of those things that need to be replaced every once in a while.
Since we've already written an article on how to tell when you need to replace your cycling cleats, here we'll dive into how to install new ones on common road and mountain bike shoes.
To keep it simple, we'll break down the tools you'll need, the setup and the install process for two- and three-bolt cleats, as well as give a high-level overview on how to position them correctly (or keep them that way).
Installation is generally a breeze—it's fine-tuning the position that takes a bit of finesse.
Tools
For those of us new to riding with clipless pedals, let's start with the basics. This might be obvious, but cycling shoes and cleats don't come in the same box when you purchase a pair of shoes. You need to make sure your shoes, cleats and pedals are all compatible with each other (more on this below).
Besides gathering the cleats, your shoes and the pedals, there are only a couple other things you need—a 4mm hex key and a permanent marker (silver works best) or some painters tape.
Two-Bolt
When it comes to two-bolt cleats, Shimano's SPD pedal system is the overwhelming favorite. This tried-and-true option is designed for commuters and mountain bikers (and people who use stationary spin bikes) due to the rugged design that can handle mud, debris and high-mileage abuse.
The cleat itself is metal and, as mentioned, attaches to the bottom of a pair of cycling shoes with two bolts. We recommend mountain bike-specific shoes, commuter shoes or spin shoes for this type of system.
To attach the cleat to the shoe, align the cleat with the two holes on the sole, insert both bolts and hand tighten as far as you can. Note there is a front and back to the cleat; make sure the pointy end is facing toward the toe (and the blunt edge faces the heel). From here, use the 4mm hex wrench and gradually tighten the bolts until they're equally snug.
Most two-bolt cycling shoes allow you to slide the cleat up and down along a preset rail before you tighten the bolts to find the right position—we'll cover this in more detail below.
Three-Bolt
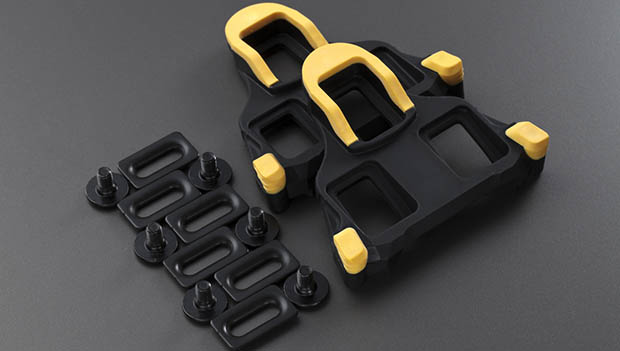
Shimano SPD-SL (different than SPD) and Look KEO are the two most popular types of three-bolt pedals. Each utilize a plastic/composite cleat that has a larger surface area for better contact with the pedal, but since they aren't flush with the bottom of the shoe, they're not meant for walking or dirty conditions. Three-bolt cleats are usually the go-to choice for road cyclists.
Similar to the two-bolt cleats, line your three-bolt cleats up with the three holes on the bottom of your cycling shoes and hand tighten until there's less play. Make sure the cleat is where you want it, and gradually tighten each bolt down—switching between bolts until all are completely snug (don't tighten one bolt completely before moving to the next).
Positioning
What are some things to keep in mind regarding where the cleat is positioned on the bottom of the shoe?
Luckily, there is quite a wide range of adjustments that allow most shoes/pedal systems to work for most of our individual body mechanics. You'd be surprised how an adjustment as small as one millimeter can make a huge difference in how your pedal motion feels.
A good starting point is to attach the cleat on the ball of your foot at the pedal axle, about right in the middle of the sole, width-wise. Hop on a stationary trainer and spin for a few minutes and notice how your knees look through the pedal stroke. Are they collapsing inward toward the frame (if so, move the cleats to the outside edge of the foot), or bowing out away from the frame (if so, move the cleats to the inside edge of the foot)? Shift into a higher gear and put some pressure onto the pedals. Do you notice that the pressure comes from the ball of your foot or more toward the toes or arch?
Remember, these tips are just a rough starting point—it can take several rides and just as many small adjustments before you find the sweet spot. If you're feeling any pain in your tendons, knees or hips, stop riding and make some adjustments. We always recommend getting a complete bike fit at your local bike shop where a trained professional will walk you through not just cleat adjustment, but saddle height, stem length, bar width and more as well.
But let's say you've already found the sweet spot and you'd like to replace your cleats without losing your optimal position on your shoes. It's simple—take a permanent marker and outline the cleat on the bottom of your shoe before you remove it (if you don't want to leave marks on your shoes, surrounding it with painters tape works as well). Since most soles are carbon fiber, a silver permanent marker works the best visually and will allow you to position your new cleat in exactly the same spot as the previous, worn out one.
READ THIS NEXT: How to Tell When You Need to Replace Your Cycling Cleats


Discuss This Article